In this next section for creating a static Excel form, we'll use a few ways to make sure the audience fills out specific areas of the form. We'll use mostly low-tech ways such as data validation. As an option, we'll also add a basic macro and discuss the disadvantages of using a macro when passing around an Excel form within a company.
Ensuring fields are completed by a User
The most basic way to catch a user's attention is just by changing the font color of an item to red. Of course, busy professionals will probably ignore even the blaring signs of red text so we'll add two reminders to make sure he/she fills out the item.Adding a message when the cell is selected
1. In the example below, we want the user to fill out the Employee Name, Requested Item, and Manager.2. Click on the cell to be filled out by your user. On the Data tab, click Data Validation and then Data Validation...
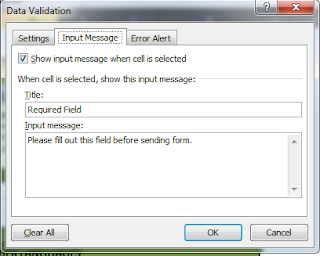
3. On the Input Message tab, check Show Input message when cell is selected. Enter a Title: and Input message.
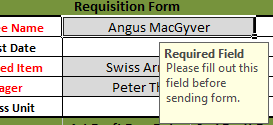
4. With the input message setting enabled, the user will get a reminder whenever the user selects the cell.
Using the IF-THEN formula to prompt a reminder
In a very simple IF-THEN formula, you can trigger a message to appear if a user leaves a specific cell blank.1. Select the cell where you want the warning message to appear.
2. Type =IF(E5=",","Cannot leave Employee Name blank",""). Substitute the E5 with the required cell to be filled out. Change the message in the quotations as needed on your form.

3. Format the font and color of the text warning. In this example, the message (and formula) is red.
For the sake of clarity, the example had the formula just next to the cell and the cell to be filled is colored grey. With the formula assigned, the user will get a warning if he leaves the cell blank. Once the form is completely finished, we'll lock and protect the cell to hide the formula and prevent changes from being made.
We now have three visual cues to inform the user to fill out three fields in the example. First, the red font. Second, the message popup when he selects the cell. Third, the IF-THEN formula. As an optional step, we're going to add a very basic, straightforward macro to prevent the user from closing the form without filling out the three required fields. As "cool" as this addition is to your form (and impressive to the rubes), there are a lot of reasons why I discourage using this if the form is going to be exchanged within a company through e-mail:
- If the Excel form is e-mailed, your company's IT security can prevent it from being attached or sent across the e-mail server due to the presence of a macro (digitally-signed or otherwise).
- Anti-virus software might make a lot of noise. Though it's just a 6-7 line script, security software can be very finicky with Office files.
- You have to make sure that the macro security settings for everyone who will receive the Excel form is set up properly for the macro to work. Otherwise, adding the macro is useless.
- It's really, really annoying for a user to get a persistent message pop-up. Imagine if your user had to go attend a meeting and had only begun to fill out your form - he wouldn't be able to close Microsoft Excel without going through all the fields you're forcing him to fill out. And he can't remove the macro because the Excel form is protected and locked. Heads will roll!
To check Macro settings and add the Before Close Macro
1. Click File then click Options.2. On the Excel Options window, click Trust Center on the left panel and then click Trust Center Settings.
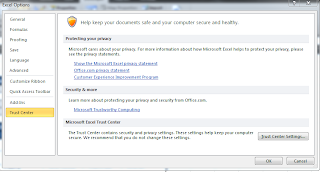
3. On the Trust Center window, click Macro Settings on the left panel and then select Disable all macros with notification. If you plan to test the macro first, you can select Enable all macros and just revert the setting later. Click OK then OK a second time.
4. On the Developer tab, click Visual Basic. This will open the MS Visual Basic for Applications interface.
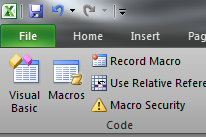
5. on the left project tree, double-click "ThisWorkbook". In this example, the worksheet with the form was renamed "Request".
6. On the allotted area for adding the script, type the following:
Private Sub Workbook_BeforeClose(Cancel As Boolean)
If Range("F4,F6,F7") = "" Then
MsgBox "Please fill out Employee Name, Requested Form, and Manager."
Cancel = True
End If
End Sub
7. Click the Save button on the main panel. Close the VB interface or click ALT+Q.

Substitute the "F4, F6, F7" with the cells you want the users to fill out before saving the Excel file. Change the text in the MsgBox contents as needed. If you plan to add this basic macro script, save the Excel form as an Excel Macro-Enabled Workbook (*.xlsm) in order to retain macro functionality. To test the macro, leave the fields blank. You should be able to save the Excel form but will receive a prompt if you attempt to close the Excel workbook or even close Microsoft Excel.
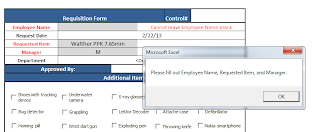
There are many, many ways to modify the script and there are plenty of VBScript experts out there with tutorials online. However, take note of the disadvantages of using macros on an Excel form. With the macro settings we configured earlier, you should get a "Security Warning" whenever you open the Excel form. The user needs to click the Enable Content button to get your Before Close macro to work. If you're going to e-mail the form, add a reminder instructing them to "Enable Content".
Additional Visual Tips for the Static Excel Form
If you're starting from scratch but want to imitate the white background of the forms typically found on the templates available from Microsoft Office Online, you can easily do this before you begin work on your form. It's much easier to do it on a blank worksheet than doing it when you're almost done with your form.To Apply a white background for an Excel Form
1. Select all the cells.2. Right-click and click Format Cells.
3. On the Border tab, select white on the Color: item.
4. On the Fill tab, click the white swatch on the Background Color: item.
Use the thick borders option for the cells to mark important sections and use colors to indicate specific areas of the form (for example, sections for "Official Use only"). Follow company color recommendations or limit color usage to the same tone. Most companies have a .PNG or .JPEG official logo you can use to tack on the Excel form to make it appear more official. Avoid fancy fonts and use a point size of at least 11.
Protecting and Locking your Excel Form
You can actually start marking off cells as protected and locked while working on the form. However, for the sake of clarity, this step was reserved for the end of the tutorial. The rule is simple: You want to protect and lock all the cells EXCEPT for the fields that the user needs to type text on or fill out.To mark a cell as locked
1. We'll protect the title cells "Requisition Form" and "Control#". Select both cells and right-click. On the context menu, click Format Cells.2. On the Protection tab, check Locked.

This will prevent others from changing that cell. For cells where you placed a formula, like the IF-THEN warning we made earlier, check both Locked and Hidden. It's extremely important that the fields that need to be filled out, such as Employee Name and Request Date in the example, should not be locked. After marking the cells, you now need to Protect Sheet or Protect Workbook.
To Protect the Excel form
1. On the Review tab, click Protect Sheet.2. Check Protect worksheet and contents of locked cells. Enter a password inside the text box provided if needed.
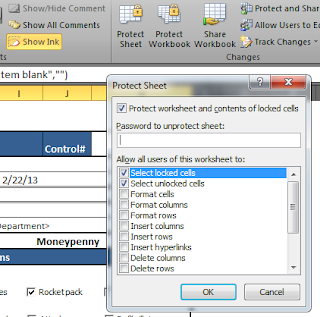
Now that you've protected your sheet, any cell that you marked protected will display a warning message when double-clicked. Moreover, cells with formulas you marked as Hidden will not show up on the Formula Bar.
E-mailing the Excel form and Exporting to PDF
It's important that you test the Excel form even if you didn't add the Before Close macro. Open it using a different Office version (like the new Microsoft Office 365). Try it on different spreadsheet programs such as LibreOffice Calc or MacOSX's Numbers. Open the workbook and fill out the fields and form controls on your colleagues' machines running Microsoft Excel 2007. Since it's a static Excel form with very little embellishments, even the cloud-based Excel Web Apps in SkyDrive should be able to open it.Finally, if you need the form as a PDF, saving the Worksheet as PDF is available in Excel 2010. This is particularly useful if your users need to print and sign the form as an alternative to digital signatures from Adobe. Moreover, PDFs are supported in almost every platform and device out there and is natively accepted in Linux. Remember, however, that when the Excel form is converted to PDF, the form is even more non-interactive and the user can't check boxes and select items from the drop-down lists.
To save the static Excel Form as PDF
1. Click File then click Save & Send.2. Under File Types, click Create PDF/XPS Document. Click the Create PDF/XPS button to save the PDF.
Another disadvantage of saving the Excel form as a PDF is that you are restricted by paper dimensions. In general, you would need to keep your Excel table fairly slim and narrow to fit properly when saving to PDF.


0 comments:
Post a Comment