Booting up Clonezilla on the target device
For this article, the target device to be imaged is an old EEEPC701.
1. For a faster backup process through the network, the netbook is connected to the router via an ethernet cable.
2. Connect the bootable Clonezilla LiveUSB to the netbook's USB port.
3. After booting into Clonezilla, click Clonezilla live then Don't touch keymap and Ok.
4. Select Start_Clonezilla then Ok.
5. Select device-image then Ok.
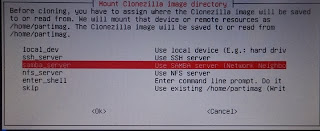
6. Select samba_server then Ok.

7. You can select a wireless network or ethernet connection. Since the device to be imaged is connected via ethernet, the correct option is eth0.
8. Click Ok.
9. Depending on the network setup, select dhcp or static. Click Ok.
Note: Clonezilla will request for a static IP address if the network is set up with a specified LAN IP address.
10. Since the ASUS wireless router connected to the external 1TB hard drive has an IP address of 192.168.1.11, the IP address to be entered in the Mount Samba server window is 192.168.1.11.

11. Clonezilla will request for the path/folder where the cloned image will be saved on your Samba share. Input the exact path where the Clonezilla image will be saved.

12. In the security mode window, select auto and click Ok.
Note: If Clonezilla issues a warning indicating that the path does not exist and the storage device was not found, do not continue with the process. Click N. If you do, the image will be saved on the source device (which in this example is the netbook).

Cancel the process and redo the steps. This time, verify the exact path of the Samba share using your Linux or Windows machine. Clonezilla does not interpret 192.168.1.11/images and 192.168.1.11/images (at sda1) the same way.

Continued in Creating a Clonezilla image and Samba Part 3


0 comments:
Post a Comment